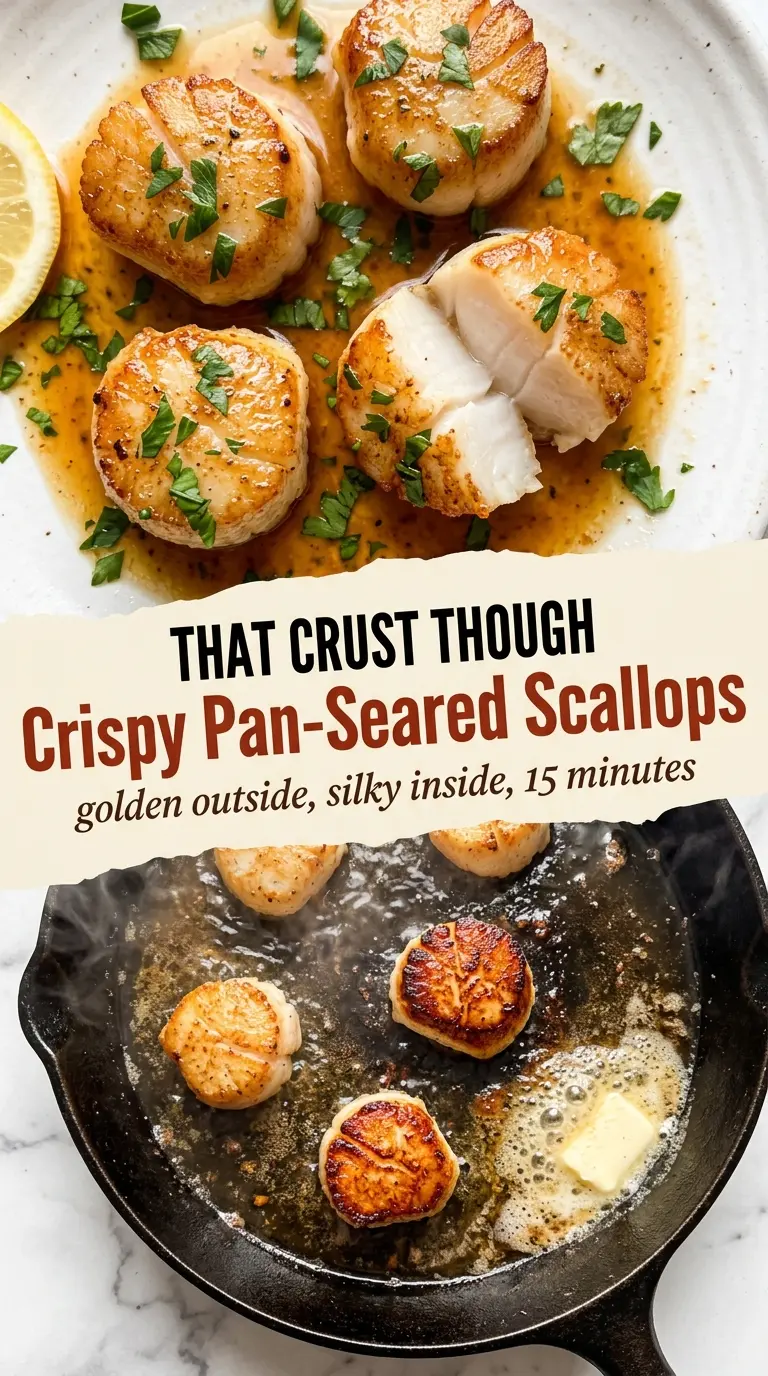
Golden, caramelized scallops with a buttery center are one of those dishes that look restaurant-fancy but come down to a few smart moves in a hot pan. The crust is the payoff here. When the outside turns deep amber and the middle stays tender and just opaque, you get that sweet, clean scallop flavor without any rubbery chew.
The trick is giving the scallops a dry surface and a pan hot enough to sear before they start steaming. Stainless steel or cast iron works best because it holds heat and helps that crust set fast. The garlic lemon butter sauce gets built in the same skillet after the scallops come out, so all those browned bits at the bottom turn into part of the sauce instead of being wiped away.
Below, I’ve broken down the timing that matters most, the ingredient choices that actually change the result, and the small adjustments that help if you want to serve these with rice, cauliflower mash, or just a piece of bread to catch every last drop of sauce.
The scallops browned beautifully and stayed tender in the middle, and the lemon butter sauce came together in the same pan without breaking. I served them over risotto and my husband said it tasted like a nice restaurant dinner.
Save these crispy pan-seared scallops for the night you want a fast, elegant dinner with a deep golden crust and bright lemon butter sauce.
The Reason Scallops Turn Rubbery Before They Brown
Most scallop trouble starts before the pan even heats up. If the surface is damp, the scallops throw off steam, and steam is the enemy of a good crust. You end up waiting for water to evaporate while the inside overcooks. Dry scallops sear quickly, and quick searing is what keeps the center sweet and tender.
The second issue is crowding. Scallops need space between them so the heat can hit every side that matters. If they’re packed in too tightly, the pan temperature drops and the scallops sit in their own moisture instead of browning. A hot skillet, a thin coat of oil, and a single layer with room around each piece are what give you that deep, even crust.
- Dry-packed sea scallops — These brown better than wet-packed scallops because they haven’t been treated with extra liquid. If wet-packed is all you can find, pat them dry for longer and expect a little less color.
- Neutral oil — Use avocado or grapeseed oil since both handle high heat without burning. Butter comes later; it browns too fast for the first sear.
- Unsalted butter — This finishes the sauce with richness and lets the lemon and garlic stand out. Salted butter works in a pinch, but reduce any extra seasoning at the end.
- Fresh lemon juice and zest — The juice cuts through the butter, and the zest adds the sharp citrus aroma that keeps the sauce from tasting flat. Bottled juice won’t give the same lift.
- Fresh parsley — It adds color and a clean finish right at the end. Dried parsley won’t bring the same freshness here.
Getting the Crust Before the Sauce Ever Starts
Drying and seasoning the scallops
Set the scallops on paper towels and press them dry on all sides until the surface feels almost tacky. Season right before they hit the pan so the salt doesn’t draw out extra moisture while they sit. If you season too early, the scallops start weeping and that first side won’t brown as well.
Heating the pan until it’s ready to sear
Warm a stainless steel or cast iron skillet over high heat until it’s hot enough that a drop of water skitters across the surface. Add the oil and swirl it through the pan in a thin sheen. If the oil smokes hard right away, the heat is too aggressive; let it settle for a few seconds so the scallops don’t scorch before the crust forms.
Turning at the right moment
Lay the scallops flat-side down in a single layer and leave them alone. After about 90 seconds, lift one edge and check for a deep golden-brown crust. If they stick, they need another few seconds; once the crust is ready, they release cleanly. Flip and cook just until the sides are mostly opaque, then move them off the heat immediately. Carry-over heat finishes the center, and that’s what keeps them buttery instead of dry.
Building the lemon butter sauce in the same pan
Drop the heat to medium before adding the butter. Once it melts, add the garlic and red pepper flakes and stir for only about 30 seconds, just until fragrant. Pour in the lemon juice and scrape up the browned bits from the pan bottom, then finish with the second tablespoon of butter, parsley, and lemon zest. If the sauce looks broken, the heat was too high when the butter went in; pull the pan off the burner for a moment and swirl until glossy.
How to Adapt These Scallops Without Losing the Crust
Make Them Dairy-Free
Swap the butter for a good olive oil at the finish or use a plant-based butter that melts cleanly. You’ll lose a little of the classic gloss and richness, but the lemon, garlic, and scallops still carry the dish well.
Make It Gluten-Free Without Changing Anything
This recipe is naturally gluten-free as written, so there’s nothing to work around. Just serve it with gluten-free sides like rice, mashed potatoes, or cauliflower mash instead of bread or pasta if that matters for your table.
Use Bay Scallops in a Pinch
Bay scallops cook much faster and won’t give you the same tall, seared crust, but they’ll still taste great in the garlic lemon butter. Cut the sear time way down and pull them as soon as they turn opaque, or they’ll turn chewy.
Make It a Bigger Dinner
Double the sauce if you’re serving these over risotto or mashed cauliflower. The scallops themselves still need space, so sear them in batches instead of crowding the pan, then return everything to the skillet only long enough to spoon on the sauce.
Storage and Reheating
- Refrigerator: Store leftovers in an airtight container for up to 2 days. The scallops will lose a little of their just-seared texture, so expect them to be softer.
- Freezer: I don’t recommend freezing cooked scallops. The texture turns grainy and waterlogged when thawed.
- Reheating: Warm them gently in a skillet over low heat with a spoonful of the sauce for just a minute or two. High heat is the fastest way to make them tough.
Answers to the Questions Worth Asking

Crispy Pan-Seared Scallops
Ingredients
Equipment
Method
- Place scallops on a paper towel-lined plate, then pat very dry on all sides until moisture is removed. Season with kosher salt and black pepper just before cooking.
- Heat a stainless steel or cast iron skillet over high heat until very hot, about 2 minutes. Add neutral oil and swirl to coat.
- Place scallops flat-side down in a single layer without crowding the pan, and do not move them. Sear for 90 seconds to 2 minutes until a deep golden-brown crust forms on the bottom.
- Flip each scallop using tongs, then cook for 60–90 seconds more. Remove scallops immediately to a plate when the sides look mostly opaque, so they finish cooking from carry-over heat.
- Reduce heat to medium, then add 1 tbsp unsalted butter to the same pan and let it melt. Add garlic and red pepper flakes and cook for 30 seconds until fragrant, stirring constantly.
- Add fresh lemon juice and swirl the pan to pick up the brown bits from the bottom. Add the remaining 1 tbsp unsalted butter and stir to emulsify into a glossy sauce.
- Stir in chopped fresh parsley and lemon zest. Spoon the garlic lemon butter sauce over the scallops on the plate.
- Serve immediately over a bed of creamy risotto, mashed cauliflower, or alongside crusty bread to soak up the sauce. Keep the scallops hot so the caramelized crust stays crisp.