Garlic herb rack of lamb lands on the table looking like something you ordered at a good restaurant, but the method is straightforward once you know where the heat belongs and where it doesn’t. The meat stays tender and blush-pink, while the outside gets a savory crust with just enough crunch from the breadcrumbs to keep every slice interesting. It’s the kind of dinner that looks elaborate before people taste it, then disappears faster than you’d expect.
The trick is treating the lamb in two stages: first a hard sear to build flavor, then a hot roast to finish the center without overcooking it. Dijon gives the herb crust something to cling to, garlic perfumes the whole rack, and panko keeps the topping from turning pasty in the oven. If you’ve ever had herb crust slide right off or go soggy, this method fixes both problems.
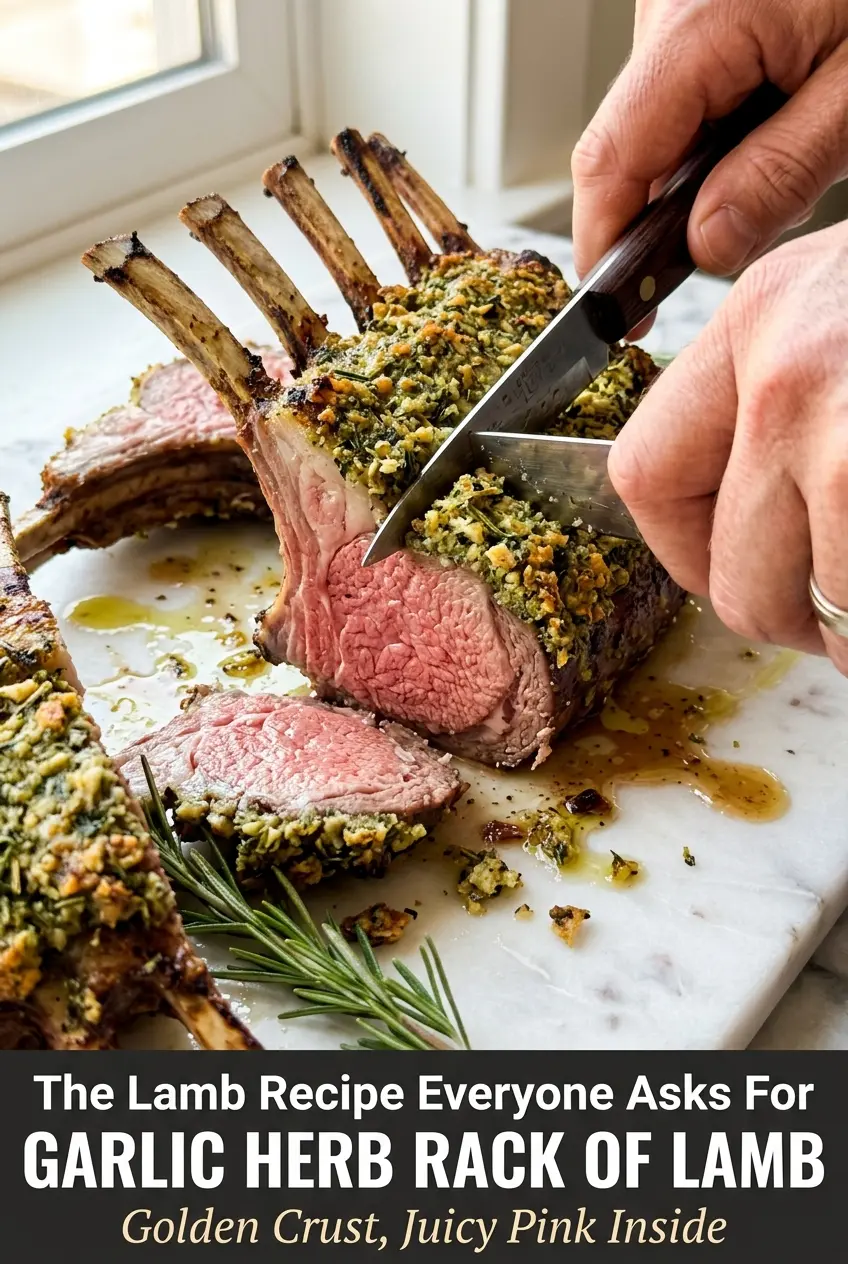
Below you’ll find the timing that keeps the lamb juicy, the texture cues that matter more than the clock, and a few practical swaps if you need to adjust for what’s in your kitchen.
The crust browned beautifully and stayed on the lamb instead of sliding off, and the meat hit that perfect pink center after the rest. I served it with potatoes and my husband said it tasted like a special-occasion dinner from a steakhouse.
Save this garlic herb rack of lamb for a dinner that feels polished, with a crisp crust and a rosy center.
The Reason the Herb Crust Stays Put Instead of Slipping Off
The most common mistake with rack of lamb is trying to build the crust on cold meat or on a surface that’s still damp. Wet lamb steams, not sears, and a crust won’t cling well enough to survive the oven. Patting the rack dry and letting it sit out for a bit gives you a better sear and a drier surface for the mustard and herb mixture to grab onto.
Another thing that matters here is the order. Sear first, crust second. If you add the topping before the pan, the breadcrumbs and herbs scorch while the lamb still needs time to brown. The quick rest after searing is just enough to keep the garlic from burning when it goes into the oven, while the Dijon acts like edible glue.
- Rack of lamb — Frenched racks look elegant and cook more evenly because the bones are cleaned up and exposed. A full 8-bone rack is ideal for presentation and slices neatly into chops after resting.
- Dijon mustard — This does more than add tang. It helps the herb mixture stick and gives the crust a sharp, savory edge. Regular yellow mustard will work in a pinch, but the flavor is less refined.
- Fresh rosemary and thyme — Fresh herbs matter here because dried herbs can taste dusty in a crust like this. Rosemary brings piney intensity, thyme keeps it earthy and balanced. If you must substitute, use about one-third the amount of dried herbs and rub them between your fingers first.
- Panko breadcrumbs — Panko gives the crust a lighter, more delicate crunch than fine breadcrumbs. Regular breadcrumbs work, but they compress more tightly and can turn dense. If you need gluten-free, use gluten-free panko and keep the layer thin.
- Olive oil — A small amount in both the sear and the crust keeps the mixture moist enough to press on without falling apart. You don’t want a greasy paste; you want something that spreads like damp sand and holds its shape.
The Two Minutes That Decide the Whole Rack
Bringing the Lamb to Room Temperature
Set the rack out long enough for the chill to come off, then dry it thoroughly with paper towels. Cold meat cooks unevenly, and any moisture on the surface delays browning. If the rack goes into the pan damp, the first thing it does is steam, and that’s how you lose the crust you’re trying to build.
Building the Sear
Heat the oil until it shimmers, then lay the lamb in meat-side down and leave it alone for those first couple of minutes. You’re looking for a deep golden crust that releases cleanly from the pan; if it sticks, it needs another moment. Searing the sides briefly helps render the outside without cooking the interior too far before the roast.
Pressing on the Herb Paste
Let the lamb cool for a minute or two so the mustard mixture doesn’t melt and slide. Press the crust onto the meat side with your fingers or the back of a spoon so it actually adheres instead of sitting loose on top. If you pile it on too thick, the breadcrumbs can brown before the herbs have time to perfume the meat.
Roasting to Blush-Pink
Roast bone side down and start checking early if your rack is on the smaller side. Pull it when the center reaches 130°F for medium-rare; the temperature will rise a few degrees as it rests. If you wait until it looks fully done in the oven, it’s already headed toward dry.
Resting Before the First Slice
Give the rack 8 to 10 minutes under loose foil before cutting between the bones. That short rest keeps the juices from running all over the board the second you slice in. If you skip it, the chops still taste good, but they won’t eat nearly as tender.
How to Adapt This for Different Tables and Different Pantries
Gluten-Free Herb Crust
Swap the panko for gluten-free panko or crushed gluten-free crackers with a light, sandy texture. The crust will still brown and hold, though it may be a touch more delicate. Avoid almond flour here; it can make the topping dense and too rich against the lamb.
Dairy-Free and Naturally Rich Enough
This recipe is already dairy-free, which is part of why it works so well for a holiday main. The olive oil in the crust gives you enough moisture and richness without needing butter, so don’t add extra fat unless the paste feels too dry to press on.
Using a Smaller Rack or Lamb Chops
A smaller rack will cook faster, so start checking temperature a few minutes early. You can also use the same herb crust on thick lamb chops, but shorten the oven time and keep an eye on the topping so it doesn’t overbrown before the meat reaches the right temperature.
Storage and Reheating
- Refrigerator: Store leftovers in an airtight container for up to 3 days. The crust softens a bit, but the lamb stays flavorful.
- Freezer: Freeze sliced lamb tightly wrapped for up to 2 months. The crust won’t stay crisp, but the meat reheats well if you keep it sealed against freezer burn.
- Reheating: Warm gently in a 300°F oven, covered loosely with foil, just until heated through. High heat dries lamb out fast, so skip the microwave if you want the slices to stay tender.
Answers to the Questions Worth Asking
Garlic Herb Rack of Lamb
Ingredients
Equipment
Method
- Remove the rack of lamb from the refrigerator 30–45 minutes before cooking to bring it to room temperature, then pat completely dry with paper towels.
- Preheat your oven to 425°F (220°C) and line a small roasting pan or rimmed baking sheet with foil.
- In a small bowl, combine minced garlic, Dijon mustard, chopped rosemary, thyme leaves, chopped parsley, panko breadcrumbs, olive oil, salt, and black pepper, then mix until it forms a thick, fragrant paste.
- Season the rack generously on all sides with salt and pepper, ensuring full coverage.
- Heat 2 tbsp olive oil in a large oven-safe skillet or cast iron pan over high heat until shimmering.
- Sear the rack meat-side down for 2–3 minutes until a deep golden-brown crust forms.
- Sear the sides for 30 seconds each, then remove from heat.
- Let the lamb cool slightly for about 2 minutes, then brush or press the garlic herb crust generously onto the meat-side, pressing firmly so it adheres.
- Transfer the rack bone side down to the prepared roasting pan, then roast at 425°F (220°C) for 20–25 minutes for medium-rare (internal temp 130°F / 54°C) or 25–28 minutes for medium (140°F / 60°C).
- Remove from the oven and tent loosely with foil, then rest for 8–10 minutes so juices redistribute for tenderness.
- Slice between the bones into individual chops, arrange on a platter, garnish with fresh rosemary sprigs, and serve immediately.